- Home
- Programs & Services
- Training
- Report Safety Concern
- How do I...
- Resources
- About Us
- Workplace Safety Culture
A. Introduction
A1. General: Pyrophoric materials ignite spontaneously on exposure to air, reacting violently with oxygen and often also with water. Proper care must be exercised when handling such materials to avoid the possibility of grievous personal injury and/or damage to property. This SOP is intended to inform on safe working practices to follow whenever pyrophoric liquids are utilized in the research laboratory; however, it is not a substitute for hands-on training by an experienced co-worker. The SOP should be read and understood prior to the commencement of relevant work and used to complement supervised practical familiarization with the various techniques described. Personnel unfamiliar with safe handling procedures for pyrophoric liquids MUST NOT attempt experiments using such reagents until properly trained and confident in their ability to perform the appropriate protocols. It is recommended that the Aldrich technical bulletin on handling air-sensitive reagents [AL-134], and its companion piece specific to pyrophoric reagents [AL-164], also be read in combination with this SOP.
A2. Examples of commonly used pyrophoric liquids: For synthetic organic chemists, the most commonly encountered pyrophoric liquids are solutions of alkylmetals in hydrocarbon solvents (e.g., tert-butyllithium in pentane), but other materials may also manifest pyrophoricity (e.g., tributylphosphine, triethylborane). Material Safety Data Sheets (MSDS), which should be consulted prior to the execution of any new experiment, will identify whether a given material is pyrophoric. This information is also likely to be indicated on the suppliers reagent label. MSDS for the common alkyllithium reagents are found below, these and other safety data sheets for pyrophoric liquids can easily be found from supplier websites (e.g., Aldrich):
• MSDS for tert-butyllithium in pentane
• MSDS for sec-butyllithium in cyclohexane
• MSDS for n-butyllithium in hexane
• MSDS for methyllithium in diethylether
B. Hazard identification, PPE, required safety equipment, and emergency response
B1. Hazards: The most significant hazard presented by pyrophoric liquids is the obvious risk of fire. To avoid accidental ignition, a protective anhydrous inert atmosphere of either nitrogen or argon gas must be maintained over the surface of the liquid at all times. Even a momentary exposure to air may result in spontaneous combustion and the possibility of a fire spreading throughout the laboratory. The use of appropriate engineering controls and personal protective equipment, together with good laboratory housekeeping, will help to minimize the severity and impact of an accidental fire. A majority of pyrophoric liquids are chemically aggressive and very corrosive reagents; accordingly, all exposure via the skin or via inhalation should avoided. MSDS will serve to identify other possible health risks that may be attendant with the use of a particular reagent. Given the significant hazards presented by pyrophoric liquids, any researcher performing an experiment with this class of reagent MUST NOT WORK ALONE.
B2. Personnal protective equipment (PPE): Appropriate eye and skin protection must be worn during all stages of any experiment involving a pyrophoric liquid reagent, as follows:
(a) Eye protection: chemical splash goggles or safety glasses that meet ANSI standard Z-87.1 must worn whenever handling pyrophoric chemicals. Ordinary prescription eye glasses will not provide the necessary level of protection unless they also meet the same ANSI standard. A face shield, worn over safety eye wear, is required in addition if there is a possible risk of explosion.
(b) Skin and body protection: gloves should be worn when handling pyrophoric liquids; however, these should not be overly cumbersome because manual dexterity is required to perform the techniques described below. MSDS for specific chemicals to be used should be consulted for direction on which glove type is recommended. A fire resistant fully-buttoned knee-length laboratory coat must be worn to protect the body. In addition, fully enclosed shoes which cover the entire foot (with no holes in the top) must be worn.
B3. Engineering controls and other safety equipment: All manipulation of pyrophoric materials must be conducted inside a well vented fume hood with the sash level at the lowest height possible to perform the required operations. Before starting work, clear the fume hood of any unnecessary equipment or chemicals. An eyewash/safety shower station should be within a ten second travel time of the site of the experiment. Familiarize yourself with the location of this important safety equipment and check that the eyewasher is functioning (pass water through it until it runs clear) and that the safety shower passed a recent inspection (within last 12 months). Also before starting work, know the location of the nearest fire extinguisher and fire alarm pull station and check that the fire extinguisher passed recent inspection and that it is not empty.
B4. Emergency response: Fire is the most likely accident, be well prepared for this eventuality and also know the correct response in the event of a reagent spill. Small fires caused by the ignition of a pyrophoric substance are best tackled with an ABC-type (powder based) fire extinguisher. DO NOT use water or carbon dioxide based units; many pyrophorics react violently with these media. As with any incident involving fire, raise the alarm as soon as possible (engage pull station alarm, call, or have someone else call, 911), and escape the vicinity of the fire if you have any doubts whatsoever that you will be able to quickly extinguish the blaze successfully. Pull down the fume hood sash, close the door of the laboratory (but do not lock it), as you exit. Depending on the strength of reagent, and atmospheric humidity, a spill may not necessarily result in an immediate fire; however, you must act quickly to disperse and neutralize the material to prevent this from happening. Powdered lime (calcium hydroxide) should be used to completely smother and cover any spill that occurs; thus, keep a container of lime within reach for this purpose when working with pyrophoric materials.
C. Procedures for the safe handling of pyrophoric liquids
C1. General: Before commencing any experiment involving a pyrophoric liquid ensure that the fume hood to be used is clear of clutter and that any unnecessary potentially combustible materials have been removed (REMEMBER, fume hood space should never be used for solvent storage). Appropriate PPE must be worn and other safety equipment as detailed above should be in place and in good working order (Section B). The control of an inert atmosphere is best handled by a dedicated gas manifold system provided with exit bubblers and multiple gas delivery lines (see Image C1-1). Argon gas is to be generally preferred over nitrogen gas because it is heavier than air. At all times during operation, the inert gas delivery system must have at least one open bubbler protected vent point to prevent over pressurization and the possibility of explosion.
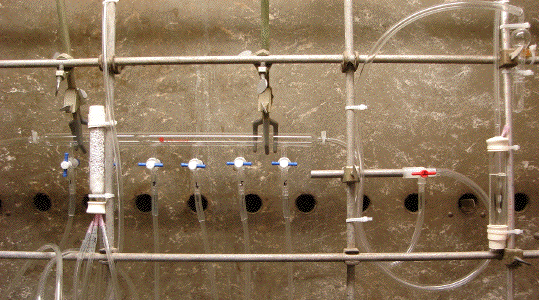
Image C1-1: An inert gas delivery manifold suitable for use with pyrophoric liquids. Anhydrous pure argon gas enters from left and an exit bubbler on right provides a vent point that can be closed off as needed by a teflon stop-cock. Inert gas is delivered via numbered teflon stop-cocks connected to flexible tubes each terminating with a short 20 gauge needle that can be used to puncture septa. A second bubbler likewise connected to a flexible tube with a needle allows for safe venting/inert gas purging of septum protected vessels.
C2. Storage: Pyrophoric liquid reagents are typically shipped in bottles provided with gas impermeable septa such that transfers can be made via needles under a chemically inert atmosphere (e.g., the "Sure/Seal" packaging system used by Aldrich, see Image C2-1). NEVER remove the protective septum from such a bottle in an air atmosphere without good reason and unless you are sure that the contents are not pyrophoric nor toxic. The reagent bottle should be kept within a secondary containment vessel (the metal can that the reagent bottle ships in is convenient for this purpose) and stored appropriately with other materials of the same hazard class. Many pyrophoric liquids benefit from being stored in a refrigerator below 10 °C (MSDS and supplier information will indicate if this is essential); however, the material should usually be allowed to warm to ambient temperature shortly before being dispensed. Specialized glass bottles equipped with glass or teflon stopcocks are superior for the storage of pyrophoric liquids and can be purchased from most laboratory suppliers (e.g., Aldrich Cat. No. Z10,733-6, see Image C2-2).

Image C2-1: An Aldrich Sure/Seal bottle; the crimped bottle cap has a septum in its center.
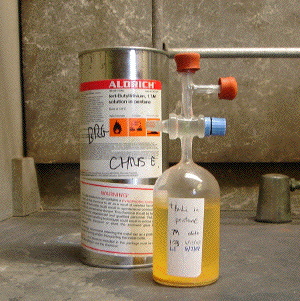
Image C2-2: A superior type of containment vessel for longer term storage and handling of a pyrophoric liquid; the flask contents can be hermetically sealed via a greased glass stop-cock and rubber septa on inlet points allow for the introduction of inert gas and withdrawl of reagent via needles.
C3. Dispensing via syringe: A single syringe transfer is appropriate for delivery of reagent volumes of up to ca. 15 mL. A little above this threshold, multiple separate syringe transfers may be employed; however, for signficantly larger volumes (>50 mL) the cannula transfer technique described below should be contemplated. Gas-tight glass syringes with needle-locking mechanisms are generally to be preferred; however, polyethylene/polypropylene syringes with friction needle locks may be used with caution (PE/PP syringes are naturally hydrophobic and seldomly seize during operation, unlike glass syringes). Before starting, check that the syringe is in good working order (plastic syringes that are old, cracked, or larger than 20 mL in barrel volume should not be used) and that the needle is not blocked (18 or 20-gauge stainless-steel needles of at least 8" in length are recommended). The syringe size selected should be AT LEAST 25% bigger than any single volume to be dispensed to minimize the possibility of pulling the plunger clear out of the barrel during operation. Once the reaction vessel (the contents of which should already be under an inert gas atmosphere) is ready to receive the liquid pyrophoric reagent of interest, navigate the following operations in turn:
(a) stand the reagent bottle on the base of the fume hood within a secondary containment vessel (e.g., a glass crystallizing dish) and clamp to prevent accidental tipping;
(b) with a gentle flow of inert gas passing through the manifold (i.e., exit bubbler open), spike the protective septum of the reagent bottle with an open inert gas input line (Image C3-1). Any excess pressure inside the bottle will be safely relieved via the open manifold exit bubbler;
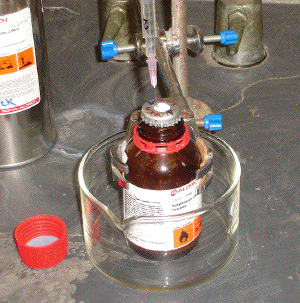
Image C3-1: Restraint of reagent bottle prior to use and introduction of inert gas input line.
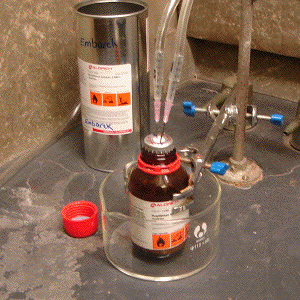
Image C3-2: Purging the reagent bottle with inert gas; the tube on the left is an input flow of Ar, while that on the right is a bubbler terminated output line.
(c) to ensure that the reagent is properly protected by an inert gas atmosphere, it is recommended that a gentle flow of gas be passed through the space above the liquid for a short period of time. This inert gas purge can be achieved by adding a bubbler terminated output line to the bottle and temporarily closing off the usual manifold exit bubbler (Image C3-2). DO NOT leave the purging flow in place for too long (1-2 min will suffice) because it may result in evaporative loss of solvent from the reagent bottle and undesirable concentration of the stock solution;
(d) liquid may now be withdrawn from the reagent bottle providing that the inert gas input line remains in place to prevent air from entering the vessel. Purge the dry syringe and needle to be used with inert gas (Image C3-3), then use the syringe needle to puncture the reagent bottle septum and withdraw a small volume of the liquid. Any gas in the syringe and needle should be excluded at this point by carefully inverting the syringe and pushing the plunger upwards. With the entire syringe assembly now completely full of liquid, gently pull the plunger out to the desired graduation point, taking extreme care not to pull the plunger beyond the limits of barrel (Image C3-4). Check the manifold exit bubbler to ensure that a slight positive pressure remains in the system throughout this operation (i.e., no suck-back of air into the inert gas system);

Image C3-3: Purging of empty syringe and needle using an Ar filled septum protected test-tube containing anhydrous CaSO4.
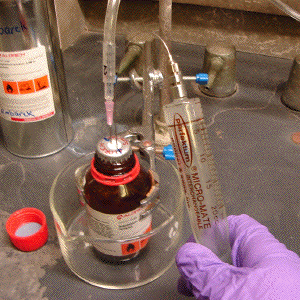
Image C3-4: Charging of syringe with liquid reagent to desired graduation point.
(e) with the desired volume of reagent measured in the syringe, gently pull the syringe needle up such that its tip remains within the reagent bottle but comes clear out of the liquid. Now, with the syringe inverted, pull a protective layer of inert gas into the syringe such that it resides over the liquid, again, be very careful not to pull the plunger beyond the limits of the barrel (Image C3-5);
(f) with a protective cushion of inert gas over the pyrophoric liquid, and with the needle now completely empty of material, the inverted syringe with attached needle can be safely transported to the proximal reaction vessel (Image C3-6);

Image C3-5: Providing the pyrophoric liquid in the syringe with a protective cushion of Ar gas for subsequent safe transport to reaction vessel.
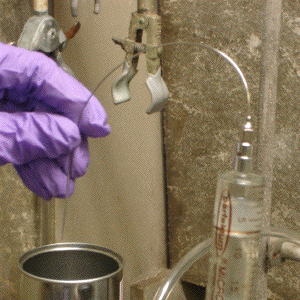
Image C3-6: Transport of the pyrophoric reagent to the reaction vessel while under a protective cushion of inert gas within the inverted syringe.
(g) push the syringe needle through the septum covering the reaction vessel and, keeping the syringe inverted for now, gently push the plunger up (Image C3-7). When the plunger reaches the graduation mark originally targeted, the dead volume in the needle will be full again; pushing the plunger further will now begin to introduce the reagent to the reaction vessel (Image C3-8). Add the reagent at a rate appropriate for the experiment. When the plunger reaches the zero mark, the exact volume of reagent measured will have been added to the reaction. At this stage, the needle should still be full of reagent - DO NOT add this volume to the reaction, it would be in addition to that measured (NOTE: the needle dead volume is compensated for because it was fully occupied when the desired reagent volume was measured and it remains full after this same volume has been dispensed);
(h) draw the excess reagent in the needle back into the inverted syringe and transfer it back into the reagent bottle. The tiny quantity of residual reagent remaining in the needle and syringe at this point (< 0.05 mL) still presents a fire hazard. In most cases, sucking excess water rapidly into the syringe will suffice to safely quench this material; however, only do so away from flammable solvents because a small spark may form momentarily. Finally, after ensuring that the pyrophoric reagent bottle remains well purged with inert gas, the gas input line can be removed and the bottle resealed and returned to its appropriate storage location (typically a refrigerator).
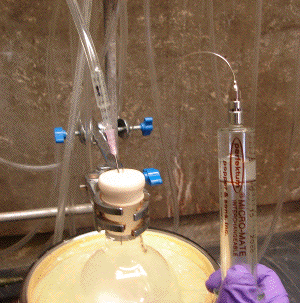
Image C3-7: Puncture of reaction vessel septum and displacement of inert gas cushion above reagent.

Image C3-8: Delivery of reagent to the reaction mixture.
C4. Dispensing via cannula (double-ended needle): Syringe transfer is not recommended for delivery of single reagent volumes above 15 mL. Large syringes (50 mL and above) have a greater tendency to mechanically fail than small ones (because of the higher pressures involved) and the danger associated with any accidental release of reagent is significantly heightened due to the increased volume. Transfer via a cannula enables large volumes of pyrophoric liquid reagents to be safety dispensed in a hands-free operation that avoids the possible pitfalls of syringe transfer. If the volume of reagent to be delivered must be measured (as would generally be the case), then two transfer steps are necessary: the liquid reagent is first "cannulated" (i.e., conveyed via double-ended needle by the action of a pressure gradient driven siphon) under an inert atmosphere from its storage container into a dry graduated measuring cylinder (or a similar volume measuring vessel), then, once the desired volume has been collected, the material is further transferred in a like manner into the reaction vessel. Once the reaction vessel (the contents of which should already be under an inert gas atmosphere) is ready to receive the liquid pyrophoric reagent of interest, navigate the following operations in turn:
(a) equip an oven dried clean graduated glass measuring cylinder with a close-fitting septum (secure with a fastener if necessary to ensure that it cannot come off) and purge with inert gas (c.f., Section C3b&c). Clamp the glass cylinder in place over a secondary containment vessel;
(b) clamp the pyrophoric reagent bottle over a suitable secondary containment vessel and briefly purge it with inert gas as described above (Section C3b&c). To aid cannulation, it helps for the reagent bottle to be at a higher level than the receiving cylinder (e.g., see Image C4-1);
(c) with open inert gas input lines fixed to both the reagent bottle and the graduated cylinder, connect the two vessels with a clean and dry stainless steel cannula (24" long and of 16 or 18 gauge is recommended), but do not dip the needle into the liquid reagent yet (Image C4-1). Add a bubbler terminated gas output line to the cylinder septum then close off both the inert gas input line into the cylinder and the manifold exit bubbler. Providing the cannula is not blocked, inert gas should now flow from the input line going into the reagent bottle, through the cannula, into the measuring cylinder and out of the bubbler output line (if not, reopen the gas input line into the measuring cylinder to prevent a pressure build up, then replace the cannula);

Image C4-1: Preparing for cannula transfer. Note source vessel (reagent bottle) is placed at a higher level than the receiving vessel (graduated measuring cylinder).

Image C4-2: Transfer of reagent into measuring cylinder. Note bubbler terminated output line on the receiving vessel; at this stage, the inert gas input line into the reagent bottle is open, but that into the receiving flask is closed.
(d) with a flow of inert gas through the cannula established, dip one end of the cannula well beneath the surface of the liquid reagent to be dispensed. Inert gas pressure above the reagent will rise and the liquid will be gently forced through the cannula and into the measuring cylinder. The transfer is aided by maintaining the level of the source vessel above that of the receiving vessel (as illustrated in Image C4-2). The rate of the transfer can be modulated by balancing the pressure inputs into the source and receiving vessels: to slow the flow, slightly open the inert gas input line going into the receiving vessel. When the desired volume of reagent has been delivered into the graduated cylinder, gently pull the cannula above the liquid reagent level (but not out of the bottle altogether) and allow inert gas to pass briefly through the cannula once again to clear it of pyrophoric material. Now, fully reopen the inert gas input line into the cylinder and also reopen the manifold exit bubbler for the moment;
(e) making sure that neither end of the cannula is below a liquid level, remove the end of the cannula from the reagent bottle septum and reconnect it to the reaction vessel septum. The reagent bottle should now be resealed and returned to its appropriate storage location (typically a refrigerator);
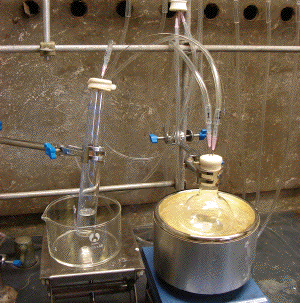
Image C4-3: Cannulation of measured volume of reagent into reaction vessel.
(f) it remains to transfer the measured volume of liquid reagent into the reaction vessel, this operation is achieved in an identical manner to the first transfer. Raising the graduated cylinder above the level of the receiving flask will again help the cannulation (Image C4-3). Following completion of the transfer, the cylinder and cannula can be cleared of residual pyrophoric reagent by adding a small volume of an appropriate dry solvent to the cylinder and cannulating this into the reaction vessel. Reset inert gas lines and the manifold system as appropriate and disconnect the cannula. If properly washed, neither the cannula nor cylinder will present a fire risk, but it is advised that both pieces of apparatus be submerged in a water detergent bath immediately.
C5. Disposal of residual reagents: The quality of any pyrophoric reagent will deteriorate over time and with usage; for example, precipitates of metal oxides/hydroxides often become visible in hydrocarbon solutions of alkylmetal reagents. Titration methods should be used to establish the molarity of a reagent before disposal is considered; however, if activity has diminished below a chemically useful threshold, or if too little of the compound is left to be worth using, then disposal is recommended. Even in small quantity or at low molarity, pyrophoric reagents present a fire hazard and a container with any residual material within it MUST NEVER be opened directly to the atmosphere. The last traces of reagent should be washed out under an inert atmosphere using an appropriate dry carrier solvent (using either a syringe or cannula transfer), and the washings quenched via a suitable neutralization process conducted under inert gas and with sufficient cooling. Most alkylmetal solutions (≤ 2.0 M) can be safely quenched by their controlled addition to a 0.5 M solution of isopropanol in anhydrous tetrahydrofuran below –40 °C and under an atmosphere of Ar. If in any doubt whatsoever as to the proper and safe manner with which to quench a given reagent, contact OSU Environmental Health and Safety and request a waste chemical pick-up. Representatives from EH&S will remove and dispose of any PROPERLY LABELED chemicals without direct charge upon completion of the waste pickup web request. Further guidance on the disposal of pyrophoric liquids can be found in Aldrich technical bulletin AL-164 [LINK].
D. Further reading and cited information sources
1. Aldrich Technical Bulletins AL-134, "Handling Air-Sensitive Reagents," 1997, 8 pp, and AL-164, "Handling Pyrophoric Reagents," 1995, 2 pp. Available from: http://www.sigmaaldrich.com/chemistry/chemical-synthesis/learning-center/technical-bulletins.html
2. The development of this SOP was prompted by a tragic fatal accident that occurred recently within the Department of Chemistry at UCLA. The following articles describe the accident and highlight the dangers associated with improper handling of pyrophoric liquids.
(a) "UCLA Lab Assistant Dies," Trager, R. Royal Society of Chemistry, Chemistry World feature January 2009. Available from: http://www.rsc.org/chemistryworld/News/2009/January/23010903.asp
(b) "Taken for Granted: The Burning Question of Laboratory Safety," Benderly, B. Science Magazine, Science Careers feature from May 2009. Available from: http://sciencecareers.sciencemag.org/career_magazine/previous_issues/articles/2009_05_01/caredit.a0900054
3. The following well written and useful SOPs from peer institutions were consulted during the construction of this document:
(a) "Procedures for Safe Use of Pyrophoric Reagents," University of California at Irvine, Environmental Health & Safety. Available from: http://www.ehs.uci.edu/programs/sop_library
(b) "The Safe Use of Pyrophoric Reagents," McGhee, K.; Norton, J. Columbia University, Environmental Health & Safety. Available from: http://ehs.columbia.edu/pyrophorics.pdf
This chemical safety advisory document was prepared solely for the use of researchers affiliated to Oregon State University. As stated above (Section A), the content is designed to inform on good working practices and it is not intended to replace hands-on practical training in the techniques described. It is the responsibility of the Principal Investigator to see to it that his/her co-workers are properly trained and informed on hazard management, including the possibility of customization of the information herein as appropriate to meet specific needs. Neither Oregon State University, nor any of its employees (including the author), makes any warranty, express of implied, or assumes any legal liability or responsibility for the accuracy, completeness, or usefulness of any information, or represents that its use would not infringe privately owned rights. Reference herein to any specific commerical product, process, or service by trade name, trademark, manufacturer, or otherwise, does not necessarily constitute or imply its endorsement, recommendation, or favoring by Oregon State University.
Author: Paul R. Blakemore ([email protected])
Inception Date: 10/29/2009
Revised: N/A